

How to Do a Scale Drawing on Graph Paper TUTORIAL
We recently shared how we Dryloked every surface of the basement to completely waterproof it (days of monsoon-ish rain take proved to be no friction match for our newly sealed basement- there'due south not an ounce of moisture downwardly there!) and painted the floor a nice rich chocolate color…

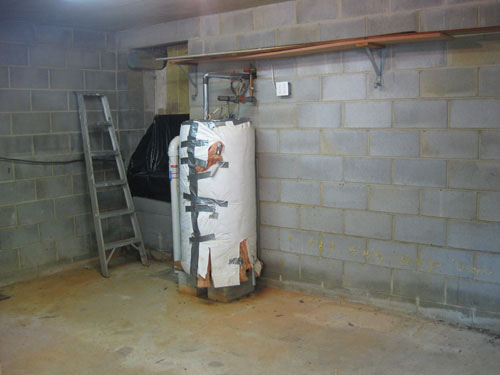
… and at present we're back to become to the fun stuff: flooring planning and picking the right storage pieces. Of course nosotros still have some small logistical projects to consummate (cleaning upward the hatch door that leads to the crawl infinite, rewrapping the h2o heater more neatly, building a divider to block the view of the water heater from the door, snagging a dehumidifier to keep moisture in cheque down there, etc) merely we'll get to those a bit later.
And for our flooring planning sesh, we even got a little matherrific and whipped out some quondam school graph paper to create a to-calibration drawing of the infinite, which really helped u.s. pin down what we needed (and definitely helped us eliminate a bunch of things that we didn't). In fact, John's easily were bandage in the starring office of "graph paper method explainer" in this video (scout information technology below or cheque it out on YouTube):
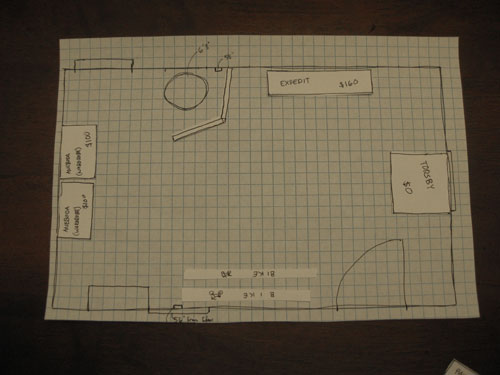
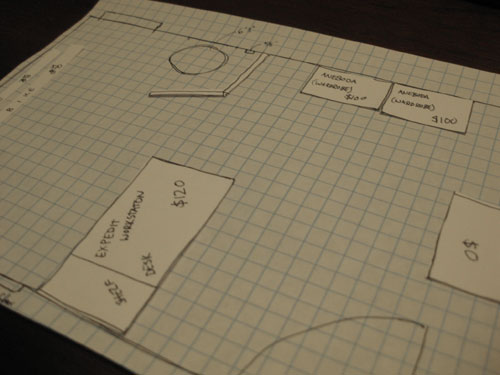
But for those of you at piece of work who can't exactly sit back and scout a quick moving-picture show about how we did all of our flooring planning/storage-slice evaluating right now, nosotros also remembered to snap a few photos of the procedure to item how it all went down. Outset we descended into the basement with a measuring tape to take downward the dimensions of the space (beingness careful to note exactly how far from the left wall the h2o heater is, where the windows are placed, etc). Then to whip up a petty to-calibration drawing all we did was decide that one square on the graph paper would exist equal to 6″ and before nosotros knew it we had a little sketch of the space that was completely authentic (only a lot smaller for obvious reasons). And then nosotros used the same 1-square-equals-a-half-foot method to sketch out little rectangles and squares to represent all of the Ikea storage systems that nosotros were because (their measurements were easily found online) which left u.s. with a pile of confetti-esque shapes that looked a trivial something like this:
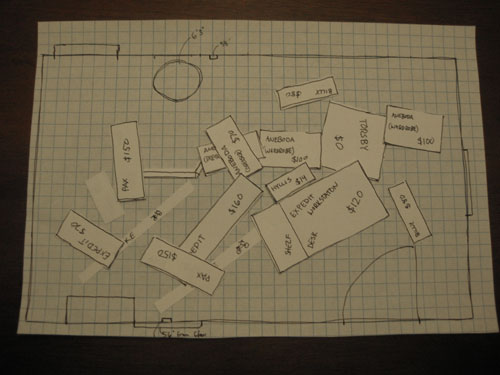
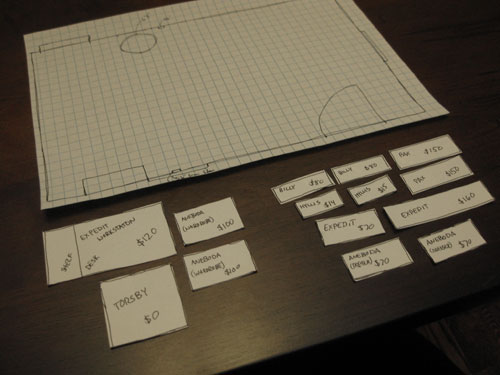
You might detect that we labeled each piece with its quirky Swedish name (for identification purposes) and the cost (which besides helped us evaluate which items would give us more bang for our buck and which were too rich for our claret). It was amazing how a slew of storage options that had our brains spinning of a sudden became a lot easier to evaluate in one case we could compare their footprints and truly experiment with where we could put what. In fact, to knock a bunch of options out right away we quickly made a list of the items we hoped to store down there (seasonal decorations, bikes, sporting stuff, actress cords, wires, hoses, former yearbooks, etc) then opted to sort our storage options ruthlessly to come across which ones would accomplish that (and which ones wouldn't really assist the crusade). On the left side we put the pieces that we thought would offering the most office, and on the right side we put pieces that certainly wouldn't hurt, but might not exist as fabulously efficient. Here'due south how the separate-em-upward method worked out:
We easily identified that the Aneboda wardrobe was cheaper than the comparable Pax wardrobe merely would notwithstanding afford united states of america the same amount of concealed storage (and we could snag two of them for $100 less than the price of two Pax wardrobes). Then the decision was easy: Aneboda in, Pax out. We besides decided that the Expedit Workstation would work overtime since information technology's just $120 for a desk and an eight-slotted shelf that we can kit out with baskets and bins to store smaller objects in a somewhat organized way (thanks to all the compartments). Information technology was definitely more of a plus for our space than the larger Expedit shelf without the desk (which was more expensive at $160 and didn't provide a surface to fix things down and sort through boxes like the Workstation did). We likewise realized that Billy bookcases wouldn't exist of much use to usa because seeing them all sketched out to scale, we realized how little depth they offered (and then we rapidly deduced that nosotros could store fashion less on such shallow shelves).
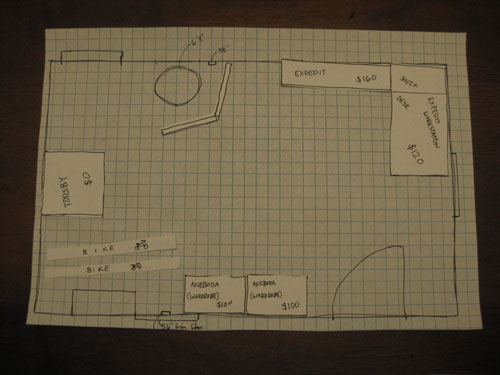
In curt, evaluating things when they were all drawn out and comparing prices & shapes really helped our brain go from scrambled and uncertain to "hmm, we might just take a plan here." And so nosotros got to move our best contenders around on the actual floor plan to see what felt all-time where. Here's the winning floor program:
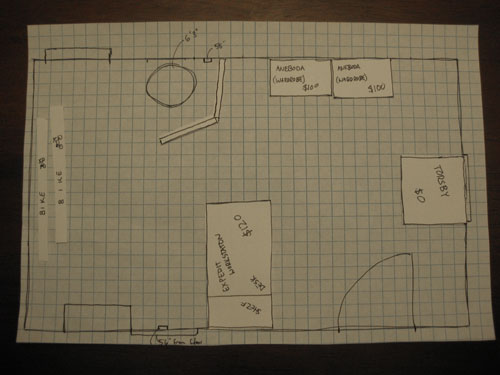
Nosotros honey that it's a combination of surfaces where we tin set things downward when we're sifting through boxes to locate something, only at that place's besides tons of open and concealed storage that we can maximize without blowing the upkeep (since nosotros already own the Torsby table we only need to purchase 3 large pieces from Ikea and we're gear up!). We also actually liked the dimension and visual separation that the Expedit Workstation'south peninsula created (which still allows for a xxx″ wide passageway betwixt the divider that we'll exist building to obscure the water heater).
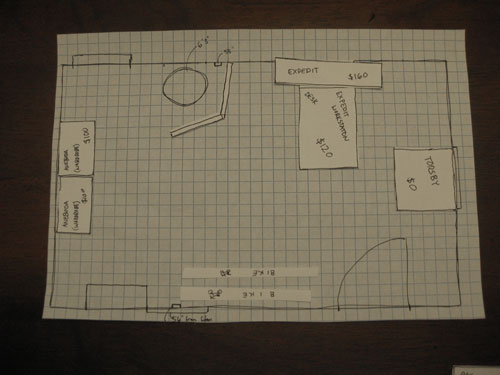
Only allow'due south support. We definitely landed on a few less functional (and more spendy) floor plans first. Like this one which didn't offering the added desk infinite of the Expedit Workstation but actually would take cost the states more in the cease. We besides thought it looked really basic and bare (like someone with a gun told all the furniture to get up against the wall). It'southward a perfect example of how spending more coin doesn't always mean you get a more consummate look in the finish…
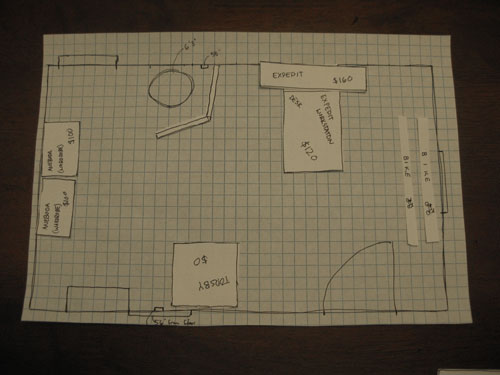
We likewise tried this plan, but once again it would take been substantially more than money and we liked placing our bikes on the left wall because we actually have an artsy footling idea that we'd like to implement backside them (and if the larger wardrobes are on that wall instead, we'll lose the opportunity to create a focal bespeak that tin be seen upon entry)…
We also tried this arrangement but once again liked the bikes on the reverse wall (this layout would also take been substantially more moolah than our winning floor program):
And lastly we tried this floor plan but everything felt a bit crowded (especially with the bikes shoved in between everything) and information technology was the about expensive solution all the same. Past a long shot.
So that's how we played effectually with little newspaper squares for about 30 minutes…
… to suss out the right combination of storage pieces for our picayune basement makeover (here's the winning floor programme again to save you lot from all that scrolling):
Now our shopping list is pretty straightforward:
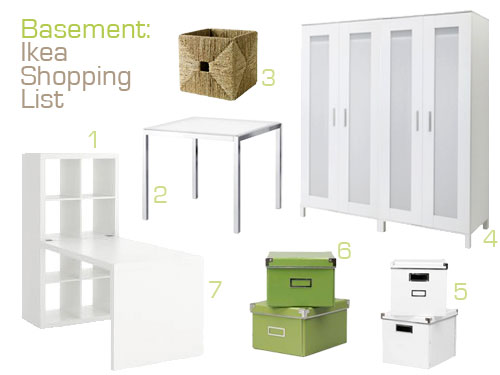
- Expedit shelf (included in the total Expedit Workstation) -$120
- Torsby tabular array (already owned, so it's free!)
- A woven basket or two – $17 each
- 2 Aneboda wardrobes – $100 a pop
- A few white storage boxes – $12 for ii
- And a few green storage boxes to keep things interesting – $12 for two
- Expedit desk (included in the Expedit Workstation) accounted for above
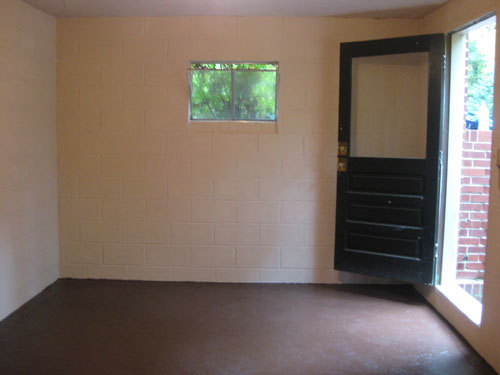
One thousand total: Somewhere around $361. Smashing for a large xix′ x 13′ room total of storage (that was previously a bug graveyard). Especially when you lot consider that one armoire is normally around $500-$1000. And of grade the floor plan could change once we have everything in the space, but it'southward slap-up to take that well-researched confident feeling that nosotros've gained from our little graph newspaper experiment. You know how stepping into Ikea can be a flake overwhelming if y'all don't have a serious program? At present nosotros have one. Oh and information technology bears mentioning that the higher up image isn't a complete mood board equally we plan to introduce art, lighting, other accessories, and DIY projects to round out the look. But it's a great kickoff for taking an utterly useless room that used to look like this…
… and turning it into something totally efficient and polished. Stay tuned for more updates after we snag (and build- ugh!) all of our Ikea piece of furniture. Fingers crossed we survive hours of allen wrenching! And while nosotros're on the subject of building Ikea article of furniture, do y'all guys have any favorite Ikea systems or pieces in your home (the Malm bed? the Lack shelf? the Expedit bookcase?). Do tell.
Want more floor planning fun? Check out the graph paper madness here and hither over on All Things G&D.
DOWNLOAD HERE
How to Do a Scale Drawing on Graph Paper TUTORIAL
Posted by: lindayourock.blogspot.com

Comments
Post a Comment